I've decided that maintaining a blog is difficult and maintaining two is ridiculous. I've decided to combine them both now. I will be adding the posts from this blog to my first blog at www.manoagirl.blogspot.com
This may make me better at posting a little more. I haven't posted anything here in a while and I haven't posting anything on my other one for a couple of months. So, visit over there. I will be adding new local style recipes there and talking about being local on the mainland, too.
See ya there.
Saturday, January 14, 2012
Friday, March 4, 2011
Youngster Has Strep
Yes, I haven't been here for a bit. Why? Well, my little guy and I were both sick with nasty head colds. Kleenex and medicine were everywhere. He is on the mend and almost 100%. I, on the other hand, suddenly got worse. I felt horrible, left work early, stayed home the next day, and, finally, went to the doctor today. I have strep throat. So, while everyone else had Chicken Parmigiana for dinner, I had applesauce.
I do have one good thing to say about the strep. The doctor was talking to me in the exam room and said, "I don't know if I've told you this, but your birthday is one day before mine."
I said, "Oh, really." He then proceeded to tell me that I looked so much younger. We then walked out to the nurse's area to get the prescription print out and he says to me, "I don't know if I should be talking about your birthday, but," now talking to the nurse, "she's a day older than me. She looks like she could be my daughter."
So, he made my day. I told him he could keep the prescription because that made me feel better already. I also said, "Wow, and I didn't even put makeup on today."
So, antibiotics and a compliment. Not a bad doctor's visit. I've got a couple recipes to post up here soon. Shouldn't be long before I am 100%!
Monday, February 28, 2011
With A Cherry On Top
If you like it than you better put a cherry on it. If you like it than you better put a cherry on it. Uh, oh, oh, oh, oh...whatever, Beyonce. Anyway, made some Cherry Almond Bars the other day. I don't really like cherry anything much. I only like fresh cherries and even then I really don't like eating them because my fingers always get stained. I'm a little strange. I can't help it. My brain won't stop thinking of the what if's in life. Please, please make it stop.
Back to the cherries. They have never been my favorite thing, so in my ongoing quest to lose weight, I thought to myself, "Hmmm, if I make these cherry bar things, I won't eat too many because I don't like cherries." Eureka, I have found my diet secret. Make stuff that taste good to other people, but not to you. Voila, skinnyville here I come.

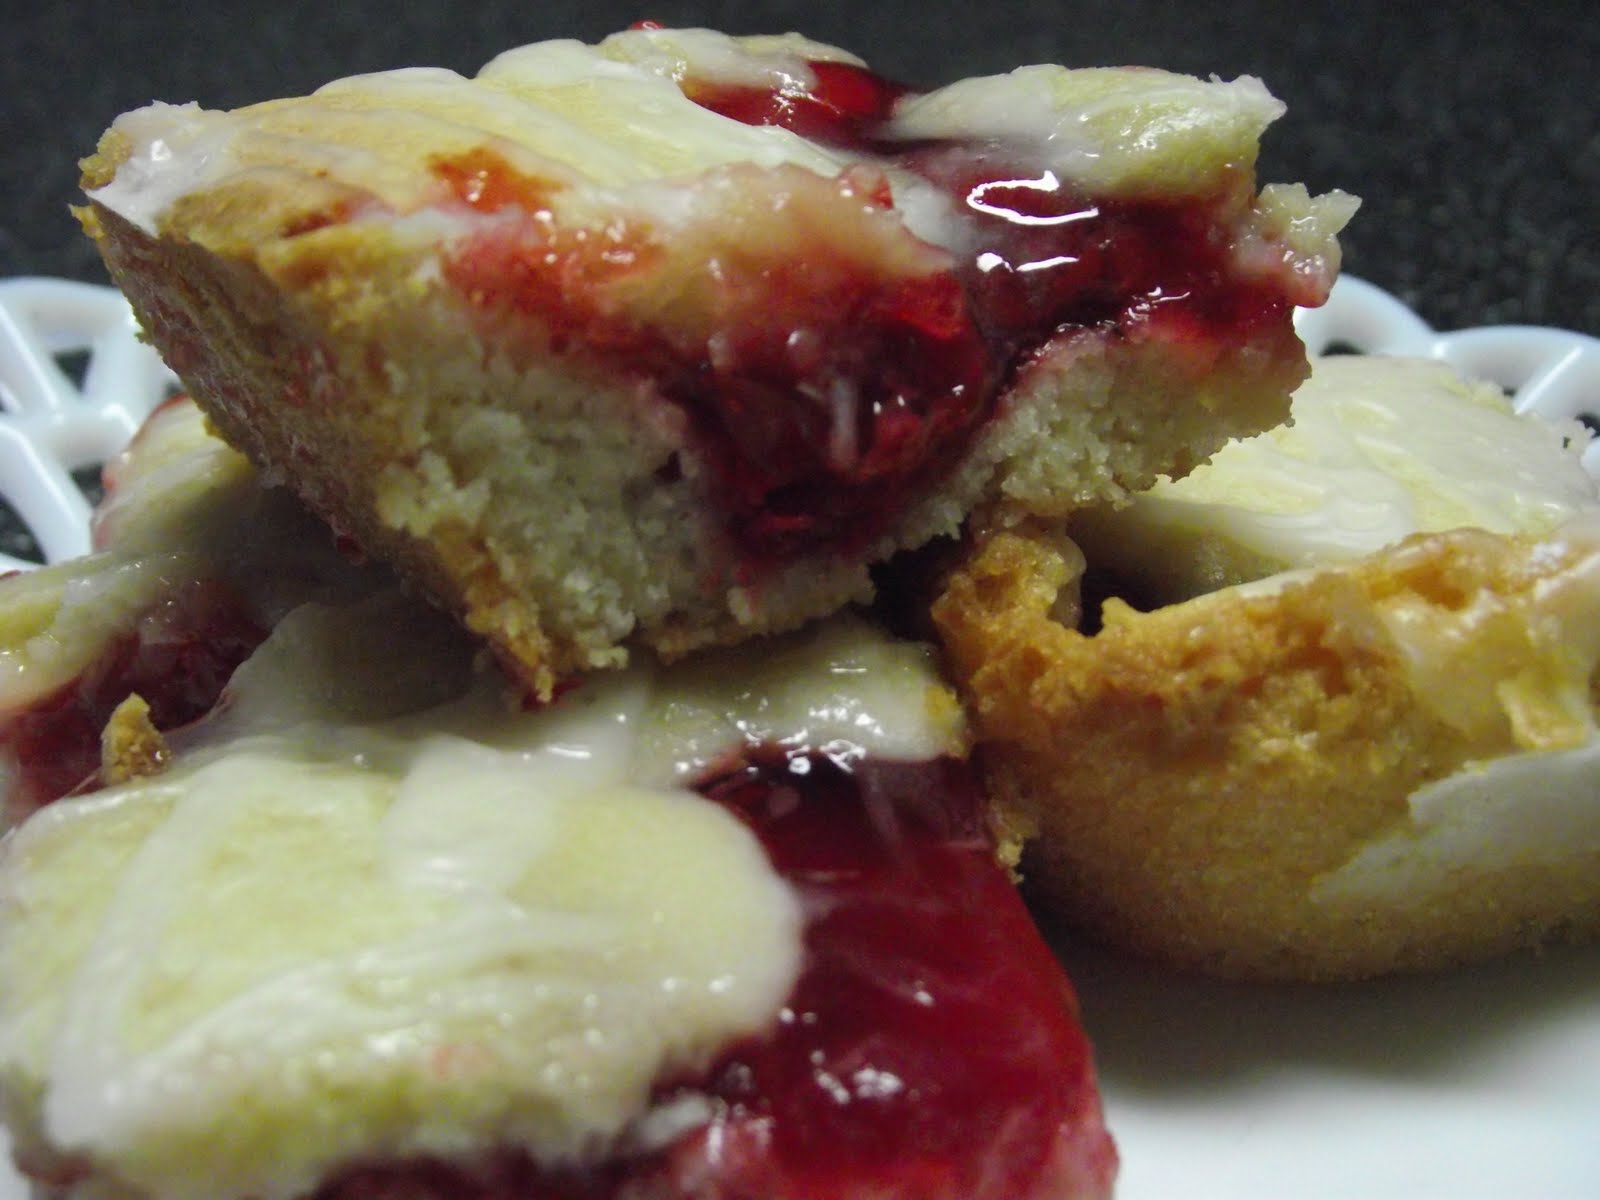
They make a huge 15x10 tray full so there was a lot. I took some to a party, some to the babysitter, and some to work. I was asked for the recipe a couple of times and today a guy from work said, "Oh, those were good. I only got to have one." I told him I would make more. I had only one, too. Cherries...remember...not my thing. Maybe it has to do with cherry being the only flavor of medicine when I was a kid. Here's a close up of them.

This is what they look like when they are out of the oven, cooled, and drizzled with the glaze.

Anyway, here's the recipe and a few tips. They are good. The middle section of mine was a little mushy. See.

I don't think there was enough batter on the bottom there and those darn cherries took over. They were not good enough to serve from this area. It was like a gory scene of a cherry homicide there. I am going to try these again and use a little less cherry filling. The almond extract added a nice flavor that complemented the cherries well.
Cherry Bars
from Taste of Home Baking Classics page 370 recipe from Jane Kamp of Grand Rapids, MI.
1 cup butter, softened
2 cups sugar
4 eggs
1 tsp. vanilla extract
1/4 tsp. almond extract
3 cups all purpose flour
1 tsp. salt
2 cans (21 oz) cherry pie filling
Glaze:
1 cup powdered sugar
1/2 tsp. vanilla extract
1/2 tsp. almond extract
2-3 Tblsp. milk
In a large bowl, cream butter and sugar until light and fluffy. Add eggs, one at a time, beating well after each addition. Beat in the extracts. Combine flour and salt; gradually add to the creamed mixture just until combined.
Spread 3 cups batter into a greased 15x10x1 inch baking pan. Spread with pie filling. Drop the remaining batter by teaspoonfuls over filling.
Bake at 350 degrees for 30-35 minutes or until a toothpick comes out clean. Cool on a wire rack. Combine glaze ingredients; drizzle over top. Cut into bars. Yield: 5 dozen.
*5 dozen is an exaggeration. Unless they cut them super small.
Back to the cherries. They have never been my favorite thing, so in my ongoing quest to lose weight, I thought to myself, "Hmmm, if I make these cherry bar things, I won't eat too many because I don't like cherries." Eureka, I have found my diet secret. Make stuff that taste good to other people, but not to you. Voila, skinnyville here I come.

They make a huge 15x10 tray full so there was a lot. I took some to a party, some to the babysitter, and some to work. I was asked for the recipe a couple of times and today a guy from work said, "Oh, those were good. I only got to have one." I told him I would make more. I had only one, too. Cherries...remember...not my thing. Maybe it has to do with cherry being the only flavor of medicine when I was a kid. Here's a close up of them.
This is what they look like when they are out of the oven, cooled, and drizzled with the glaze.

Anyway, here's the recipe and a few tips. They are good. The middle section of mine was a little mushy. See.

I don't think there was enough batter on the bottom there and those darn cherries took over. They were not good enough to serve from this area. It was like a gory scene of a cherry homicide there. I am going to try these again and use a little less cherry filling. The almond extract added a nice flavor that complemented the cherries well.
Cherry Bars
from Taste of Home Baking Classics page 370 recipe from Jane Kamp of Grand Rapids, MI.
1 cup butter, softened
2 cups sugar
4 eggs
1 tsp. vanilla extract
1/4 tsp. almond extract
3 cups all purpose flour
1 tsp. salt
2 cans (21 oz) cherry pie filling
Glaze:
1 cup powdered sugar
1/2 tsp. vanilla extract
1/2 tsp. almond extract
2-3 Tblsp. milk
In a large bowl, cream butter and sugar until light and fluffy. Add eggs, one at a time, beating well after each addition. Beat in the extracts. Combine flour and salt; gradually add to the creamed mixture just until combined.
Spread 3 cups batter into a greased 15x10x1 inch baking pan. Spread with pie filling. Drop the remaining batter by teaspoonfuls over filling.
Bake at 350 degrees for 30-35 minutes or until a toothpick comes out clean. Cool on a wire rack. Combine glaze ingredients; drizzle over top. Cut into bars. Yield: 5 dozen.
*5 dozen is an exaggeration. Unless they cut them super small.
Wednesday, February 16, 2011
Peanut Butter Brownies or Cheesecake?
It was Valentine's Day a few days ago which was reason enough to try out a new dessert. But, there are so many to choose from. Looked through that Taste of Home Baking cookbook again and found a recipe for Peanut Butter Brownies.
Peanut butter, chocolate, cream cheese - what's not to like? Yes, I could've just bought a brownie mix, but where's the challenge in that? Instead I far exceeded the cost of a brownie mix. This brownie recipe called for 2 blocks of cream cheese.
And, in the end, I'm still not sure if it was more like a brownie with peanut butter cream cheese or a peanut butter cheesecake with a little brownie in it.
Here's what they looked like when they came out of the oven.

Pretty nice looking, huh? And, here is what they looked like on a plate.

How about a side view.

You know how brownies, cakes, and cookies all taste so, so good when they are warm and right out of the oven? Not with these. We all tasted a little when it was warm and we thought it really didn't have much of a peanut butter taste and they were just okay. Then, I put them in the refrigerator. That did the trick. When cold, these tasted like cheesecake.
I have a really good tip for you brownie bakers. You know when you try to cut brownies and your knife goes in and brings up a whole bunch of brownie with it. This always happens and you get a really gnarly looking brownie. Here is the trick. Drum roll, please? Use a PLASTIC KNIFE! That's right. One day I thought about how mochi is so sticky and you use a plastic knife to cut that, I wonder if it would work for brownies - and it totally worked.
Here's the recipe:
Peanut Butter Brownies from Taste of Home Baking Classics
3 eggs
1 cup butter, melted
2 tsp. vanilla extract
2 cups sugar
1-1/4 cups all purpose flour
3/4 cup baking cocoa
1/2 tsp. baking powder
1/4 tsp. salt
1 cup milk chocolate chips
Filling:
2 pkg. (8 oz. each) cream cheese, softened
1/2 cup creamy peanut butter
1/4 cup sugar
1 egg
2 Tbsp. milk
In a large mixing bowl, beat the eggs, butter, and vanilla until smooth. Combine the sugar, flour, cocoa, baking powder, and salt; gradually add to the egg mixture. Stir in chocolate chips. Set aside 1 cup for topping. Spread remaining batter into greased 9x13 baking pan.
In a small mixing bowl, beat the cream cheese, peanut butter, and sugar until smooth. Beat in egg and milk on low until just combined. Carefully spread over batter. Drop reserved batter by tablespoonfuls over filling. Cut through batter with a knife to swirl.
Bake at 350 degrees for 35-40 minutes or until a toothpick inserted in the center comes out clean. Cool on a wire rack. Chill until serving. Makes 3 dozen.
Tuesday, February 15, 2011
Char Siu Chicken

Char Siu. In Hawaii, we all grew up eating this in so many ways. A few slices in your saimin, chopped up in fried rice, straight from the meat hook at the China Town roast pork and char siu man's stand, inside a manapua (char siu bao). I really have no idea what the correct pronunciation is of Char Siu. Growing up we all said, "Char Shoe." Doesn't sound very appetizing, does it?
For those of you that aren't in the know - char siu is the pork many Chinese restaurants use in their Roast Pork Fried Rice. It is red on the outside from the tons of food coloring that goes into it. In Hawaii and anywhere else there is a China Town, you can get Char Siu and Roast Pork by the pound. Here, 40 miles away from Chicago, good luck.
I never even thought of making Char Siu myself. Fortunately, our friends, C&C, that live about 30 minutes away from us and are also Hawaii born made this Char Siu Chicken for us once and we have been making it ever since.
Here's an interesting story, we met C&C at a Japanese restaurant in Naperville, IL about 11 years ago. We were waiting for our table and I saw this Japanese guy and his little girl walk up to get some mints at the front counter. My husband and I looked at each other. I said,"They're from Hawaii." My husband said, "Oh, because of his shirt." C was wearing a Crazy Shirt with a gecko on it. I said, "No, I heard him talk."
So, as C&C and their 5-year-old daughter E were leaving I said, "Eh, you from Hawaii?" We started with the usual questions: What high school did you got to and what year did you graduate? Where did you grow up? and so on. Of course, like every local person, you make connections. C went to high school with my cousin at Kaimuki High School. And, that was the start of a great friendship. In fact, they were in Hawaii this past New Year's Day and came to my grandpa's house in Manoa to join us for lunch. Crazy, small world, isn't it?
We are grateful that we met them. They are good friends, C loves beer as much as my husband, but the best part of having them for friends is we go the Char Siu recipe. Just kidding. After getting the recipe, I realized that I had the cookbook this recipe was in for years, but had never tried it. You can make this using pork also, but the chicken is great to throw on the grill. See how much I've lost my pidgin - I meant to say on the - hibachi.
We find that for the most ono results you need to soak the chicken for at least 2 days. I use boneless, skinless chicken thighs I get from Costco. I have also used boneless, skinless chicken breasts. They are, as you would expect, a little drier, but still good. Oh, and if you want, you can always add red food coloring to make it look more Char Siu-y.
First make the sauce.

Place your chicken in a zip top bag, close it well, and place in a bowl just in case it leaks. Refrigerate for 24-48 hours. (48 is best). Flip the bag every once in a while to make sure the sauce coats all the chicken well.

Grill until perfectly charred and caramelized. Serve up with some white rice and veggies. Grind!

Char Siu Sauce (from Taste of Aloha)
1 cup brown sugar
1/4 cup soy sauce (shoyu)
1/2 tsp. sesame oil
1/8 tsp. Chinese Five Spice
1 clove garlic, minced
2 tsp. sherry
1 tbsp. Hoisin sauce
1 tbsp. red food coloring (optional)
Mix all ingredients thoroughly. Marinate meat 24-48 hours and grill. You may also bake your pork, chicken, or spareribs at 350 degrees. 1 hour for chicken and pork. 30 minutes for spareribs.
* I usually make a double recipe to soak my chicken. This ensures that each piece is well coated.
Thursday, February 10, 2011
Almond Apricot Bread
Last week we had one of the worst blizzards, since I have lived in Illinois. I have to say being a Midwesterner for almost 16 years, I do know so much more about snow. Of course, when the blizzard hit us last week and we got over 20 inches of snow, our snowblower wouldn't start - again!
While the hubby was at work, my oldest son and I went out and started clearing snow. One of my wonderful neighbors - we are lucky to have many - came over and helped out with his snowblower. I am all about showing my appreciation for these acts of kindness. I really think he loves snowblowing because he did the sidewalk and our driveway - hooray! I decided I needed to bake something for him and his family. I looked through my Taste of Home Baking Classics Cookbook. It was only $12 at Costco. And, why do asians like a bargain so much? I won't see any asians for a while and then - boom - I go to Costco or the outlet mall and they are all there.
Whatever, I found the recipe I wanted to try. Almond Apricot Bread. It sounds interesting and easy. I run to the store because I have no dried apricots and absolutely no apricot baby food. Thank goodness, no more babies here. Of course, there is only one choice for baby food, an apple apricot. That'll do.
It came out nice looking.

The recipe was simple and the bread looked pretty when it was done. Here's the recipe:
Apricot Almond Bread
2-1/2 cups all-purpose flour
1/2 cup sugar
1/2 cup packed brown sugar
3 tsp. baking powder
1 tsp. salt
1 (7 oz.) apricot baby food (or similar)
1 egg
3/4 cup plus 1 tsp. milk, divided
3 Tbsp. canola oil
1-1/8 tsp. almond extract, divided
2/3 cup sliced almonds, coarsely chopped
1/2 cup diced dried apricots
1/2 cup powdered sugar
In a large bowl,combine the flour, sugars, baking powder, and salt. Set aside 1 tablespoon of baby food for glaze. In another bowl, beat the egg, 3/4 cup mil, oil, 1 tsp. almond extract, and remaining baby food. Stir into flour mixture just until moistened. Fold in almonds and apricots.
Pour into greased 9x5x3 inch loaf pan. Bake at 350 degrees for 55-65 minutes or until a toothpick inserted near the center comes out clean. Cool for 10 minutes before removing from the pan to a wire rack to cool completely.
For glaze, combine the powdered sugar, reserved baby food, remaining milk, and extract until smooth. Drizzle over cooled bread. Yield: 1 loaf (16 slices).
Those must have been some small slices because there was no way we got 16 out of one loaf. See all those little pieces of almond and apricot? Scarily, this reminds me of a fruitcake.

Obviously, I made two loaves one for the neighbor and one for us. Looks like someone was ready for a bite!

Monday, February 7, 2011
Chicken Katsu Plate
Chicken Katsu is a standard plate lunch offering. Most of the fine dining establishments that serve plate lunches offer it as a choice for your entree. And, when I say fine dining, I mean anywhere that serves you lunch on a paper plate or in a styrofoam lunch container with a plastic fork and knife.
Speaking of plate lunch serving ware - does anyone else totally miss the paper plate inside a box? Remember, when every plate lunch you got came on a paper plate, not styrofoam and it was in a bakery style box. I just remember the awe I felt when I opened the top of that box to reveal the treasure inside. Whether it was teriyaki on a bed of cabbage, chili and a hot dog, teri chicken, a veal cutlet drenched in rich, brown gravy. Save me - I could go on and on. The problem is that if I go on and on, I will add pounds and pounds onto my under 5 foot frame.
So, back to the Chicken Katsu plate. Here in Illinois - I have three choices: 1) I can go to the very big Japanese store, Mitsuwa, about 30 minutes away and go to their food court for a Japanese style Chicken Katsu. 2) I can drive to Chicago, about an hour away on a good day, where there is an actual place that serves mediocre plate lunches, 3) I can make Chicken Katsu, rice, and macaroni salad at home with my own two little hands.
Today, I chose the third option because it is just too crazy cold to be driving all over for a taste of Chicken Katsu. Besides, my homemade plate lunch tastes better than the other two options. Usually, I make my Chicken Katsu with the 3-step battering approach. Flour, egg wash (egg diluted with a little water), and then panko (Japanese breadcrumbs). This time I decided to try a recipe that is supposed to be L&L Drive-Inn's. This recipe is from the By Request - The Search for Hawaii's Greatest Recipes cookbook from Betty Shimabukuro. I bought this cookbook on our latest visit to Honolulu. I have to tell you why I bought it.
It includes a request I made to her about 7 years ago for the Kapiolani Bakery Prune Cake Recipe. It is on pages 120 & 121 of the cookbook. She should've asked me, I would've let her use my name. This prune cake recipe is not the right one though. I recently found another one that I am going to try. I have to tell you that I have the proof that it is me. I have the article cut from the paper and it still comes up on an internet search. So, enter my name and prune cake and you will find it. Sad, but true, I am associated in the world wide web with prune cake. Back to the Katsu.

The Close Up:

L&L Chicken Katsu
15 to 20 chicken thighs, boned and skinned (I use chicken breasts)
1 pound panko
Batter:
2 eggs
3/4 cup cornstarch
1/4 tsp. each salt, white pepper, garlic powder
1 cup water
Katsu Sauce:
1/4 cup Worcestershire sauce
1/2 cup ketchup
1/2 cup sugar
1-1/4 cups water
1/4 tsp. salt
1/8 tsp. each chicken bouillon, white pepper, garlic pepper
dash of Tabasco sauce
Preheat oil to 325 degrees.
Open the chicken thighs and flatten. (This is where I do things differently because I am lazy.) I just cut the chicken horizontally into thinner pieces. I also use chicken breasts because my kids prefer them and they are a little healthier. Like it matters when it is deep fried.
Combine batter ingredients. Coat chicken in batter, then in panko. Fry in oil until golden brown and crispy.
To make Katsu Sauce: Combine all ingredients and bring to a boil. To thicken, add a small amount of cornstarch dissolved in water. (I did not do this. I just cooked it down until it was thick.) Chill.
L&L Katsu Sauce:

Mom's Katsu Sauce Recipe:

To make my Mom's Katsu Sauce:
1/3 cup A-1 Steak Sauce
2 tsp. ketchup (she spells it catsup)
1 tsp. shoyu (soy sauce for the haoles)
2 tsp. sugar
dash of pepper
dash of hot pepper sauce
Mix all ingredients together.
The one on the left is the L&L and my mom's recipe is on the right:

So, we had to do a taste test. We tried our usual Katsu sauce recipe from my mom and the L&L Sauce. The L&L sauce is much sweeter. Mom's is much more A-1 based. Since my little guy could take A-1 intravenously, he likes mom's better. The rest of us couldn't decide. They are both so different. Mom's is much easier because it does not require any cooking. You can do your own taste test.
As for the katsu, I think I will go back to my way salt and pepper the chicken then dip in flour, egg wash, and panko. The panko seems to love the chicken more. It hangs on for dear life. The L&L stayed on also, but required more ingredients and time. And,in the end, there isn't much of a taste difference.
By the way, this homemade plate lunch also included, what I like to call, my Lazy Okole Mac Salad. By the way - I usually use another word for okole that rhymes with pass, gas, and bypass. Heehee. All I do to make this is boil up some macaroni, drain, add some grated carrot, salt, pepper, and Best Foods (Hellmann's) mayonnaise. And, I insist on Best Foods or Hellmann's -depending where you live.
So, go cook up your own Katsu! I am already thinking of the next plate lunch. Maybe - Korean - yes, Meat Juhn or Kal Bi with Bean Sprout Namul. While I am thinking of the next plate lunch my hubby and the two younger ones have been stricken with too much Chicken Katsu...just look at them.

Subscribe to:
Posts (Atom)